So, you’re staring into your fridge, willing it to magically produce a meal that’s both impressively fancy and embarrassingly easy to make. You want that “I-slaved-over-a-hot-stove-all-day” credit without, you know, actually doing that. Friend, I feel you in my soul. And I’m here to tell you that the answer isn’t in your fridge—it’s in these ridiculously easy and foolproof stuffed fall recipes. We’re talking about taking the season’s best produce, stuffing it with delicious things, and letting the oven do all the hard work. It’s culinary magic, minus the complicated spell.
Why This Recipe is Awesome?
Let’s cut to the chase. This isn’t just *a* recipe; it’s a blueprint for autumn awesomeness. It’s idiot-proof, even I didn’t mess it up, and I once tried to open a can with a hammer. The beauty here is in the formula. You learn one simple method, and suddenly you can create a whole lineup of stunning dishes. Having friends over? Boom, impressive stuffed squash. Just want to eat your feelings on a Tuesday? Hello, cozy stuffed apples for dessert. It’s versatile, it’s forgiving, and it makes your house smell like a Pinterest board. Plus, it’s the perfect way to use up those random bits and bobs in your pantry. That half-bag of nuts? In it goes. That lonely sleeve of crackers? Crush ’em up!
Ingredients
Here’s the deal: think of this as a choose-your-own-adventure list. You need a base veggie/fruit, a filling base, some add-ins, and a little love.
The Main Event (Pick One):
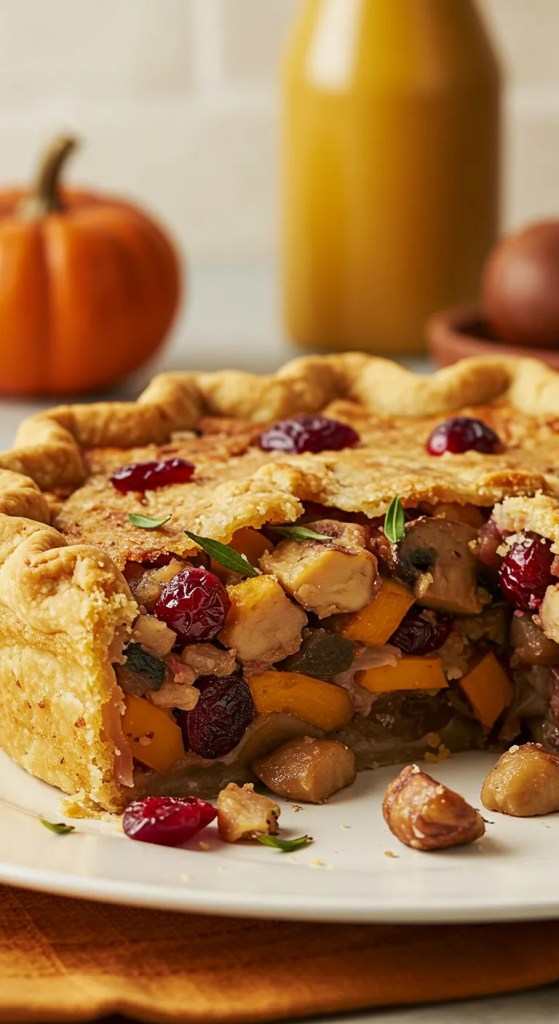
- 2 medium acorn squash or 1 large butternut squash: Your edible bowls. No fancy slicing required.
- 4-5 medium bell peppers: The classic. Colorful and impossible to mess up.
- 4-5 large apples: For when you need dessert to be a main course. No judgment here.
The Filling Foundation:
- 1 cup cooked grain: Quinoa, rice, farro, or even couscous. Use leftover takeout rice, I won’t tell.
- 1 lb protein (optional but hearty): Ground Italian sausage (my fave), ground turkey, or lentils for a veggie option.
- 1 medium onion, diced: The silent hero of flavor.
- 2-3 cloves garlic, minced: Because life is better with garlic.
The Flavor Booster Add-Ins:
- 1/2 cup dried cranberries or cherries: For a sweet little pop.
- 1/2 cup chopped nuts (pecans, walnuts): For that essential crunch.
- 1-2 cups fresh spinach or kale: To feel virtuous.
- 1/2 cup feta, goat cheese, or parmesan: Cheesy, salty goodness. Non-negotiable, IMO.
The Liquid Gold:
- 2-3 tbsp olive oil or melted butter: For roasting and richness.
- Salt and pepper: The dynamic duo.
- Your favorite herbs: Sage, thyme, rosemary—fresh or dried, they’re all winners.
Step-by-Step Instructions
- Preheat and Prep. Crank your oven to 400°F (200°C). While it’s heating up, tackle your main event. For squash, slice them in half from stem to stern and scoop out the seeds with a spoon. For peppers, slice the tops off and pull out the seeds and ribs. For apples, core them, creating a well but leaving the bottom intact. Pro tip: Rub the inside of your veggie bowls with a little oil and sprinkle with salt. This is the first step to flavor town.
- Par-cook the Shells. Place your hollowed-out veggies or apples on a baking sheet, cut-side up. Pop them in the oven for 15-20 minutes. This softens them up so they’re perfectly tender by the time the filling is cooked. Nobody wants a crunchy, undercooked squash.
- Make the Filling. While the shells are roasting, heat a tablespoon of oil in a skillet over medium heat. Cook your onion until it’s soft and translucent, about 5 minutes. Add your garlic and cook for another minute until it’s fragrant. If you’re using a protein like sausage, cook it in the skillet now, breaking it up until it’s browned. Then, stir in your cooked grain, your add-ins (cranberries, nuts, spinach), and half of your cheese. Season the whole mixture generously with salt, pepper, and herbs.
- Stuff ‘Em! Carefully take the baking sheet out of the oven. Your shells should be slightly softened. Spoon the filling mixture generously into each one, mounding it up high. Don’t be shy! Top with the remaining cheese. The more filling, the better—this is a no-skimping zone.
- Bake to Perfection. Return the baking sheet to the oven and bake for another 15-20 minutes, or until the cheese is melted and bubbly, and the edges of your veggie or apple are beautifully caramelized.
- Rest and Devour. Let them cool for about 5 minutes before serving. They’re basically molten lava straight out of the oven. This resting time is crucial for the flavors to get to know each other. Then, dig in!
Common Mistakes to Avoid
- Skipping the Pre-Bake: Thinking you can just stuff a raw, rock-hard squash and have it turn out? Rookie mistake. The pre-bake (par-cooking) is non-negotiable for even cooking.
- Underseasoning the Filling: The veggie shell itself needs seasoning, but the filling is where the party’s at. Taste your filling before you stuff! Boldly season every layer.
- Overcrowding the Pan: Give your stuffed beauties some personal space on the baking sheet. Crowding leads to steaming, not roasting, and we want roasted, crispy-edged perfection.
- Using Soggy Grain: If your quinoa or rice is wet and mushy, your filling will be too. Make sure your cooked grain is relatively dry and fluffy.
Alternatives & Substitutions
Don’t have exactly what the recipe calls for? Welcome to cooking. Here’s your cheat sheet.
- Grain-Free? No problem! Use riced cauliflower instead of quinoa or rice. It soaks up flavor like a champ.
- Veggie Swap: Not a squash person? Try portobello mushroom caps or even large tomatoes. The method is the same!
- Dairy-Free? Skip the cheese or use a vegan alternative. A sprinkle of nutritional yeast can give you that cheesy, savory vibe.
- Nut-Free? Swap the nuts for sunflower seeds or just leave them out. The cranberries will still give you that nice texture contrast.
- Short on Time? Use pre-cooked grains from the freezer section or a pouch. Use pre-diced onions. FYI, taking shortcuts is a sign of intelligence, not laziness.
FAQs
Can I make these stuffed recipes ahead of time?
Absolutely! You can assemble them completely, cover the baking sheet with foil, and refrigerate them for up to 24 hours. When you’re ready, just bake them, adding a few extra minutes to the cooking time since they’ll be going in cold.
What’s the best way to reheat leftovers?
The oven or toaster oven is your best bet (about 350°F until warm) to keep the texture right. The microwave will work in a pinch, but it might make the shell a bit soft.
My squash is impossible to cut! Help!
This is a legit problem. Two solutions: 1) Poke a few holes in it and microwave it for 2-3 minutes to soften the skin slightly. 2) Carefully use a sharp chef’s knife and a steady surface. Place the knife where you want to cut and press down firmly, using the weight of your body.
Can I freeze these?
You can, but the texture of the vegetable might get a little watery upon thawing. The filling itself freezes beautifully. I’d recommend freezing just the filling in a container, then thawing and stuffing fresh veggies another day.
Is this actually a main course or just a side?
With a protein like sausage or lentils in the filling, this is 100% a satisfying main course. If you just do grains and veggies, it makes a fantastic side dish for a larger feast.
Can I use a different cheese?
Of course! Gruyère is amazing with apples, sharp cheddar is classic with peppers, and mozzarella gives you that epic cheese pull. Go wild with what you love.
Related Recipe:
- Pumpkin Bread with Cream Cheese Swirl
- Soft Pumpkin Cookies with Cream Cheese Frosting
- Sausage Tortellini Soup with Spinach | Easy Autumn Soup
Final Thoughts
And there you have it. You are now armed with the knowledge to conquer fall, one stuffed vegetable (or fruit, we don’t discriminate) at a time. This recipe is less about rigid rules and more about having fun in the kitchen and creating something truly delicious with minimal stress. So go on, preheat that oven, and get stuffing. You’ve got this. Now go impress someone—or, more importantly, yourself—with your newfound skills. You’ve earned that cozy, delicious victory.

